Showing posts with label Re-Do. Show all posts

Sunday, February 5, 2012

Another T-shirt Redo!

Well, I figured that being that it's a new year, I better post something!!  :)  I've been so busy with so many things lately, just haven't had too much time to be crafty!!  (Think I said that a few times before!) :(  However, I did manage to do a quick t-shirt redo the other day & I think it turned out kinda cute!!  :)

 I started out with a plain long sleeve shirt.  (Forgot to take a picture before I cut the sleeves off, but I'm sure you can imagine what it looked like!!  ;)  I used a short sleeve shirt as my guide, and cut off the sleeves of the long sleeve shirt.
 Then, I cut the sleeves into strips, about an inch (or less) thick.


I pinned the strips onto the shirt, then sewed them on.  I didn't have the right green thread, so I chose pink - ya know, to add a little color!!  ;)


With the left over strips, I made a few flowers & sewed them on by hand.  Totally nothing fancy, but added a little fun to my plain shirt!!  :)


Wednesday, August 31, 2011

Mirror Re-do

I found this mirror at Goodwill (or "Goodjohn's" as my son calls it ;) - for only $2.99!!  It wasn't horrible "before", but I like the "after" better!!  :)  I used Apple Barrel Gloss paint - in black, of course, and after a few coats, it was done!!  (Could totally use spray paint, but I didn't have any on hand!!)  Now I just have to find the perfect spot for it!!  ;)


 Before
After

Saturday, February 5, 2011

TWO Months = TOO Long!!!!

Yes, it has been 2 months since I last updated - been a little busy around here!!!  Haven't had a ton of time to be crafty, but I've tried to sneak in a few projects lately!!!  :)  Here's a quick project I managed to finish recently:

* Chair Make-over:
Madelyn has a (kinda cheesy) black chair in her room, so I thought I'd jazz it up a bit!  I saw this fuzzy pink zebra fleece at Hobby Lobby & had to have it!!  It was a remnant, so I think I only paid about $2 for it!  Here's what I did:
- Unscrewed the seat & back from the chair frame.


- Peeled off plastic piece from the back of each cushion.
- Laid each piece face-down on the wrong side of the fleece.
- Hot glued (could have used a staple gun, but for some reason, couldn't find mine!!) fabric around the back of each piece (back of chair & seat), pulling tightly as I glued, and trimming excess.


- Snapped plastic pieces back on (a little tricky).
- Screwed pieces back onto frame.   - - Viola - a new cute chair for Madelyn!!!  :)


I've started a few other projects, so hopefully I can finish them soon & get them on the blog!!

Monday, August 9, 2010

Fabric Flowers

I love the cute fabric flowers that are EVERYWHERE, so I decided to give it a try!! These are a little time consuming, but super easy!! The materials I used are:
- hot glue gun
- extra glue sticks
- fabric scraps
- scissors
- buttons/embelishments if desired

* The first step is to cut strips of your fabric. Cut long strips - you can always stop "rolling" your flower & cut the fabric to make smaller flowers!

* Next, take the end of one strip & kind of roll it a little. Put a dab of hot glue on one side & kind of pinch the sides together.

* Now, just keep rolling the fabric around the center, creating a "spiraled" effect. As you roll, continue to add dabs of hot glue here & there to secure it.

There is an alternate way to make this flower - twist the fabric as you make the "spiral" - this will give a "neater" look, however, I found it way too time consuming! :(

* I kind of forgot to take a picture of the finished flower, however, here is the finished project:

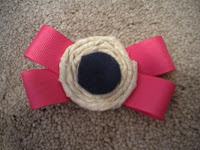
For this, I just made 9 different flowers, (4 small pink, 4 medium tan, and 1 large tan), then hot glued them all together & topped them off with a fabric-covered button (didn't have a button the size & color I wanted, so I used a scrap of an old shirt to cover a button!!)!! I haven't yet, but plan on attaching pins (like broach pins) to the back, so this can be removed for washing (or adding to another shirt)!! I also made a bow (using the "twisting" technique)! Turns out, Madelyn has two pairs of shorts that this will match with!! :)

Another bow/flower idea:
I bought this shirt, which had yellow sleeves, (you know, the 2 sleeve look), so I simply cut out the yellow sleeves, making it a short-sleeve shirt! (You can get really cheap shirts at the end of winter, & just cut out the layered sleeve - - ta-da. . . a short sleeve shirt for summer!!!) :)

Anywho - I used one of the sleeves to create a flower for Madelyn's hair!! :)

Sunday, June 20, 2010

Earring Re-do

My daughter wanted some black earrings, so we set out to find some. Looked at every store in the mall & didn't really want to pay $8 for one pair. Stopped by Wal-Mart & couldn't even find a pair there!! Thought about buying the materials to make a pair, but realized that it would be about the same as what I DIDN'T want to spend!! However, I found some earrings on clearance - 9 pairs for THREE dollars!!!!! Bargain! Well, the earrings were turquoise, yellow & green - - great colors, however, not black, and we didn't need 3 pair of each color! So, thinking like a crafter ;) I came up with a great plan. . . why not paint them!!!??? We went home & got out the nail polish & ended up with 9 new pair of earrings, all different colors . . . for only $3!!!

Like my Circle K earring holder??? ;) I tried a few other things to hold the earrings while I painted (polished) them, but this actually worked the best!!! We kept one of each of the original colors, then added black, purple, red, red/white/blue, and pink!! (One pair actually broke, so we only had 8 in the end - - still a great deal!!) After they dried, I went over them with clear, sparkly polish!!

Wednesday, June 16, 2010

Clearance Art Re-Do

I found some REALLY cheap "art" at Hobby Lobby. I wasn't too fond of it, however I saw some potential! :)

I came home, started thinking, and this is what I came up with (sorry, but I forgot to take pictures of each step, but I'm sure you get the idea!!):

Sanded the dark brown piece - (not too bad actually), then took apart the blue/pink pieces - only to find that they were made of 3 separate pieces . . . score!!! :) I had some scrapbook paper that I've been wanting to use, so I covered the outside frame, then trimmed the center. I took the yellow crown off the original center piece & covered that piece with paper as well. The original center piece actually fit perfectly on top of the outside frame!! Basically, I turned my once "introverted" art into "extroverted" art! :) They're nothing super fancy, but I think they turned out cute!! (And the price was great - - about $2 each, being that I already had the paper!!)