Showing posts with label sewing. Show all posts

Thursday, September 13, 2012

Re-usable Sandwich Bags

At our house, we have 3 out of our 4 kids in school.  Three kids that never buy school lunch.  Therefore, we use an average of 4-5 sandwich bags per kid, per day.  That's a total of 12-15 per day, and 60-75 per week!!!  Now, that's a lot of baggies!!!  I've seen the re-useable bags on Pinterest & the internet, and wanted to make some, so I finally got around to it!!  ;)

I went to Hobby Lobby & didn't know what the fabric was called, so I explained it to the lady there.  She said it's what people make training pants for babies out of . . . but still no "name" for the fabric! ;)  (And like a dork, I didn't ask!! ;)  So - - whatever it's called. . . it's quite pricey!!  :(  It was between $12-$14/yd (depending on print)!!  However, I only got 1/2 yd & used my 40% coupon!!  :)

I must first say, (like I've mentioned a few times before), I do NOT claim to be an expert seamstress!!  I can make things, but my stitches aren't perfect!!  I had to tell myself, "Remember - these are sandwich bags. . . who cares how 'perfect' they are(n't)!!!"  :)

With that said - - here's what I did:

I used blue fabric - - there wasn't much of a choice. . . blue, green, baby dinosaurs or girly owls!!  :)  Now, with 2 boys & a girl in 6th grade. . . I thought blue made the most sense!!  ;)  I also used sew-on velcro.  I pre-washed the fabric, but wasn't sure if I could dry it, so I just laid it out to dry.  (It dries really quickly!! :)


The first few bags I made turned out a little too narrow for a sandwich, so they will be used for chips, fruit, cookies, etc!  :)  I ended up using strips that were 15 x 7", folding the top over 1" & just leaving a little gap between the top & the opening of the bag.  (And on some of the bags I made toward the end, I didn't even fold the top over - - just sewed the velcro right under the flap!!  ;)  I stitched around the top, sewed the velcro on, (apparently I didn't take a picture of that! :( , then sewed down the sides of the bag.  I added a little strip of ribbon to the tops of a few bags. :) I made a few small "snack-size" baggies with the extra fabric!!  (I didn't even worry about the raw edges being that this fabric doesn't fray!!  Once again - - they're only sandwich baggies!!  Had this been a gift, the stitches might have been a LOT neater!!  ;) 
I have to say - - this fabric is NOT fun to sew!!  The rubber-like lining kept gripping my machine & the silky top didn't hold still that well!!  :(  Therefore - my stitches were NOT pretty!!  However - they're done & now I have about 8 bags!!  8 bags from 1/2 yd - - which came out to about $3+!!  Not too shabby!!  I'm going to go back & get some green next!!  When the kids are done with the bags, I turn them inside out & wash them with dish soap & set them out to dry - - super easy!!  It takes a few extra seconds, but oh well!!  ;)  How's that for "goin' green" (or blue in this case)????!!!!  ;)  ;)


Monday, June 11, 2012

Disney-Bound!

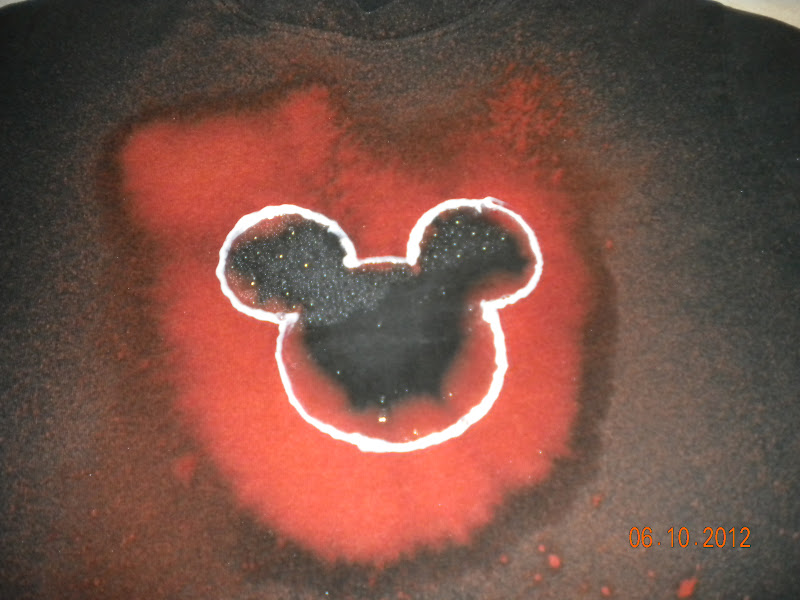
California, here we come!!  :)  We're going to Disneyland & 2 of my 4 kids had Mickey shirts that they wanted to wear!  Well. . . that left 2 without shirts, so . . . I had to get creative!!!  ;)  Both shirts were super simple (like all my projects ;) - but my son's was the easiest!!!

For his shirt, we used:
* a black shirt
* contact paper (I'm sure freezer paper would have worked MUCH better - but used what I had!! ;)
* bleach (and bleach pen if desired)
* spray bottle

 First, cut a Mickey shape (I used a pattern of course!) out of Contact Paper.  Remove paper backing & attach to shirt.  Make sure it's completely stuck to shirt (technical, I know! ;).
 Put bleach in spray bottle & spray shirt as desired!!!  Make sure to cover edges of contact paper  to leave the shape outline.  *** Like I said above - freezer paper would probably work much better, because the bleach went under the Contact Paper :( - - however, we still liked the end result!!
 We were not expecting the red when we sprayed bleach!!  It was kind of a cool surprise!!  (After it was washed & dried, it faded to a rust color - so neat!!)
  I used a bleach pen to trace the Mickey outline, to try & make it stand out a little more!  I left it on for about 10 minutes, then washed & dried the shirt.
  The final product!!  It's unique to say the least!!!  ;)  My husband said it looks like flames -  - could just be the firefighter in him!!!  ;)


For my daughter's shirt - - it looks simple (which it actually was), but was kinda time consuming!!  She loves zebra print, so we did a simple black Minnie head with a zebra bow!!
I used the same pattern as above - and cut a black head out of felt.  I sewed it onto the shirt, made a simple bow out of zebra fabric & hand sewed it on!!  Easy peasy!!  ;)

Sunday, February 5, 2012

Another T-shirt Redo!

Well, I figured that being that it's a new year, I better post something!!  :)  I've been so busy with so many things lately, just haven't had too much time to be crafty!!  (Think I said that a few times before!) :(  However, I did manage to do a quick t-shirt redo the other day & I think it turned out kinda cute!!  :)

 I started out with a plain long sleeve shirt.  (Forgot to take a picture before I cut the sleeves off, but I'm sure you can imagine what it looked like!!  ;)  I used a short sleeve shirt as my guide, and cut off the sleeves of the long sleeve shirt.
 Then, I cut the sleeves into strips, about an inch (or less) thick.


I pinned the strips onto the shirt, then sewed them on.  I didn't have the right green thread, so I chose pink - ya know, to add a little color!!  ;)


With the left over strips, I made a few flowers & sewed them on by hand.  Totally nothing fancy, but added a little fun to my plain shirt!!  :)


Monday, October 31, 2011

Costumes - A Queen Bee!

Happy Halloween!!!  :)  Ok, so I'm barely making it in the same month as my last post, but oh well!!  ;)  Wanted to post some costume ideas, even if it's too late for this year!!  :/  The skirt ideas could be used all year long!!  This year, the costumes I made were: a Queen Bee, an Alien, a Safari Guide, and Minnie Mouse!!  :)  They were all relatively easy, but the skirts took a while!
**** NOTICE: I do am not, nor do I claim to be an expert seamstress!!  I can sew ok, but not perfectly!!  Being that these are only "costumes", which will be worn at night. . . in the dark - - I wasn't going for perfection!!  ;)  With that said. . .

This is the Queen Bee costume I came up with:
* 1 yd. striped fabric
* 1 yd. black tulle (had extra)
* 1 yd. yellow tulle (had extra)


** Yes - her shirt is crooked!!  It's not sewn crooked, just didn't straighten it for the picture!!  :(
I started with a black skirt we already had.  This skirt was knit & kinda hard to work with! :(  (Could have been from the shape of the skirt!!)
 I trimmed a little off the bottom, to remove the "angled" shape.
 I took my (pre-washed) striped fabric, and cut 6 strips.  (Sorry, don't know the exact length - can't think of the length of the fabric off hand!!  :(  The width will depend on the size of skirt you will be making.  I believe mine were around 6".
I hemmed the tops & bottoms of each layer & sewed 2 pieces together, giving me enough to make 3 layers. 
Then, I gathered the tops of each layer.  I repeated this process for both tulle layers.  The black tulle went on top of the stripes & the yellow went on the bottom. 
 I sewed the striped & the yellow layers together, then pinned them onto the skirt, attaching the black tulle at the same time.  I repeated this process until all three layers were on the skirt.

The finished product!!  :)  For the shirt - we went to Goodwill & found 2 cute shirts (on dollar day, I might add!! ;) & we were set!  I cut the straps off the black shirt, only because they were "itchy", so I just stitched the shirts together in 2 spots!  (This way, I can remove the black shirt & the yellow shirt can be worn again!!)


Accessories:
Since she was a "Queen Bee", she had to have a crown & a staff!!  ;)  (I found the wings at the 99 cent store!!! :)

For the staff:
I started with a paper mache ornament & a dowel - found both at Hobby Lobby.


 I took the ornament, and cut off the "hanger" part!  (Technical name, huh?? ;)  Then, I poked a hole in the bottom & made it large enough for the dowel to just fit.


 Next, I painted the dowel black, and the top gold.  After the pieces dried, I put the dowel into the top & hot-glued along the base.  I added some misc. gold ribbons & stuff that I had left over from my wedding (forever ago!!)!!  :)


 For the crown:
I drew a crown shape, free-hand (don't laugh!!), onto a thin piece of card stock (it was packaging from a scrapbook kit, so it was larger than 12x12").  It was folded in 1/2, so it cut 2, but I didn't cut on the fold!  (Wanted it to be thicker!!)  Then I cut 2 straps - again, wanting one thick strap!


I spray painted the pieces gold & hot glued them together!!  I added some more of the gold accessories & viola!!  A crown!!  ;)


Tuesday, August 23, 2011

Skirt to Shirt

I guess cleaning out everyone's closets lately has inspired all the "clothing" projects!! ;)  This one, however, was super simple (just my style), so I had to do it!!  ;)

I had an old skirt (it was actually my sister's & I rescued it from a garage sale, noticing its potential! ;) It's not a typical elastic waist skirt, but rather a gathered waist.


Simple steps:
I had my daughter try the skirt on (as a shirt), then I marked where to cut in the back.  After marking, I turned the skirt inside out.  Next, I basically did a good 2" seam. (If you look super close, you can see it - about 2" from the right edge.)


Next, I trimmed close to seam, top to bottom.


I took that extra piece I cut off, cut off the gathered top & lining, and cut the piece in two.  With each piece, (right sides together), I sewed along the open edge, making 2 "tubes".  I turned them right sides out, and pressed them flat with the seams in the center.


Finally, I had my daughter try the top on & pinned the straps on to fit!  I pinned the straps on, cut off the extra & folded the edge under to hem.  I did a simple seam across the edge & I was done!! :)


Turned out pretty cute, if you ask me!!  :)  I figured that since it was my sister's, I should give it to my niece - - needless to say, my daughter was a little bummed!!  ;)  (Guess that's a good thing??) ;)