Thursday, May 24, 2012

Teacher Necklace

I wanted to make a cute (and cost-effective ;) gift for my kids' teachers.  There are tons of ideas out there, but when you have to give three gifts, it can get pricey!!  (And #4's not even in school yet!!!  Actually - I'M her teacher. . . guess I better go buy myself something!!! ) hahaha!! ;)

Anywho - this is the little necklace I came up with!!!  Simple & cute - just the way I like it!! ;)  I spent $10 (after using a 40% off coupon) - but pretty good for 3 necklaces!!


Supplies:
* I found this really cool "cork" paper that is adhesive-backed - it was $1.99 & I only used a small corner of it!!
* Necklace "cords" (technical, I know! ;) - that came with 3 sets!!!  They were under $4, and I used my 40% coupon!
* Jolee's glittery apples (on sale for $2.50!)
* Raw wooden jewelery tags (which were on sale for $0.99!!)
* sandpaper
* craft paint
* Mod Podge (I used regular & glitter)

 I sanded the wooden pieces, painted them, then distressed the edges.
 I cut the cork paper to fit & stuck it on.  I used my eyelet setter to punch the hole out in the cork paper!  (It was the only thing small enough & sharp!! ;)  I printed the teacher's names & cut them out.  I attached them with clear Mod Podge, then once that dried, I applied glitter Mod Podge over the entire thing, front & back!
 I removed the little sticky dot from the back of the apple, then hot glued it on!
I attached the cord & ta-dah. . . a necklace!!!  ;)  (The necklace cording came with clasps but they're not in the picture.  You could just tie the cords in a knot - I thought it didn't look "finished" that way, but depends on you!!  ;)  I wrapped these up in tissue & put them in a cute bag with some candy!!  I think the grand total was about $13 for 3 teacher gifts!!!  ;)

Monday, May 14, 2012

Mother's Day

I wanted to share a few of my Mother's Day gifts!!  I didn't personally "make" anything, but I was a lucky mom & received a bunch of cute stuff!!! :)

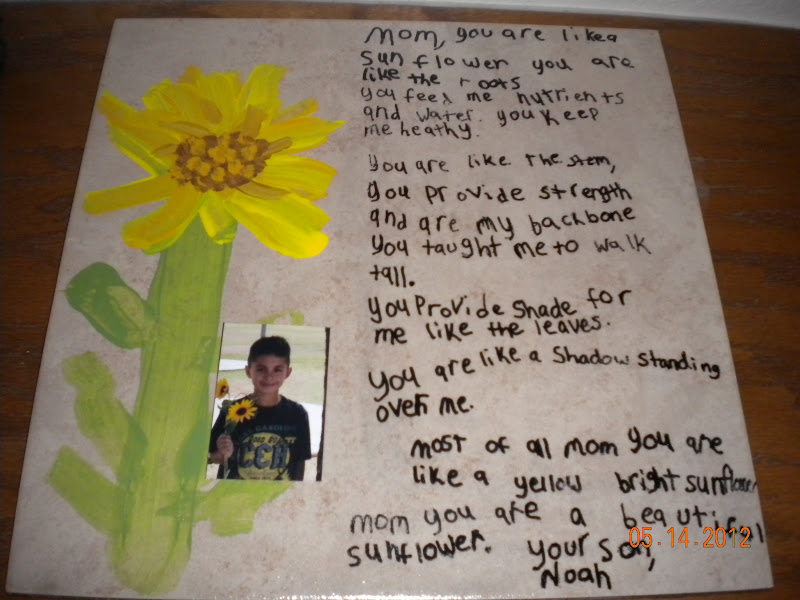
The most labor-intensive gift (I don't have "favorites" ;), has to be from my 3rd grader!!  EACH kid got a 13" tile, wrote a long poem on it in Sharpie, painted a large flower on it, attached a photo of themselves (that the teacher took), and then Mod Podged it!!!  THEN. . . they made a card (with another photo attached), and decorated their own wrapping paper!!!!  So cute!!!

The poem says:  (The teacher told them the lines with the parts of the flower, but they created the lines that tells what each part does!!!  LOVE it!!!  ;)

"Mom, you are like a sunflower - you are like the roots
you feed me nutrients and water.  You keep me healthy.
You are like the stem,
you provide strength and you are my backbone
You taught me to walk tall.
You provide shade for me like the leaves.
You are like a shadow standing over me.
Most of all mom, you are like a yellow bright sunflower.
Mom - you are a beautiful sunflower.

The card says:
Love you lots!
With all my heart.
Love your seed,
Noah


Talk about a tear-jerker!!!!  Now, I know this wasn't really a sappy poem, but considering it came from my "often difficult" child ;) ;) - - it really got to me!!!

I also got a vase of super cute, colorful tissue paper flowers, made by my oldest at Activity Days!!
These came with a little sample of hand/foot scrub that they made!!  So fun!!!  :)


This is the adorable card that my kindergartener made:

"This little flower is special, you see, Because it was made from a part of me.  My painted thumb made each flower part  To show I love you with all my hart!  Happy Mother's Day!"
This is his cute drawing inside!!  :)


I serve in the Primary at Church, and we gave the kids each a bag of M&M's to give to their moms, with this cute little attachment:
 "M&M - - Mom & Me moment" -
The idea is for the kids to eat the candy with Mom & for each color that they pick, they ask the question on the card!!  So cute!!  I played it with one of my kids & it was fun to hear the responses!!  :)

Friday, May 11, 2012

Hooray For Teachers!!

Being that this week was teacher appreciation week, I managed to get around to a few little projects!!  :)  I was lazy & didn't start my "appreciation" until Wednesday, so the teachers each got 3 gifts.  ;)  For Wednesday, I made each of our teachers (3), a notebook (totally simple - just covered a spiral notebook with scrapbook paper & added their initial!!), but was really bummed when I realized I forgot to take a picture!!  :(  I also gave them a flower pen (wrapped in floral tape with a silk flower on top)!!  For Thursday, I personalized cups, filled them with my new favorite popcorn & wrote a little note on a new notepad!  (The notepads were leftovers from some free stuff I was given, but they had the word "Nice" at the top & a red border at the bottom. . . so they worked!!  ;)

 Wrote their names with a Sharpie - totally simple!  I think the cups were 4/$2 @ Wal-Mart!
 Very addicting popcorn!!!  :)  All packaged up in a simple lunch sack!!


For today, I gave 2 of the teachers a bag of Flipz, with a note that said, "I've been doing Flipz all year with you as my teacher!"  - Kinda corny, I know - but again, it worked!! ;)  For the 3rd teacher, I knew she liked Twix, so I got her a pack of them & attached a note that said, "To a GOLDEN teacher!"  ;)  The last treat went to my daughter's orchestra teacher - a Symphony bar with a note: "Thanks for helping my begin my journey to the symphony!"  (Get it - "Symphony. . .  orchestra. . . again, corny I know!! ;)


I wasn't a teacher for long, but long enough to know that they truly appreciate the thought & it doesn't have to be elaborate!!  Everyone likes to be appreciated!!!  ;)

Wednesday, April 25, 2012

Boxes to Book-holders


Quite a while ago, I found some diapers on sale (and had a coupon, of course ;) & they came in cool boxes!!  I just new that some day, I'd get around to using them!!  Well, about a year later. . . I finally did!!  :)  This is what I came up with!!  - - Totally not super original, but this is my spin on book-holders!!  :)

Before:


After:


Super simple!!  Painted the insides & spines of the boxes - Mod Podged scrapbook paper on sides & front - added a glitter Mod Podge coat all around!!  :)  After I finished the 3 diaper boxes, I made another one out of a (large) cereal box!!!  Perfect for magazines!!  :)


Cut off top & 1/2 of one side.


Painted, papered & Mod Podged!!  :)

Tuesday, April 3, 2012

Simple Easter Wreath

 Well, I managed to complete at least ONE Easter project before Easter!!  ;)  I really wanted a wreath for my door, but didn't want to spend a ton on a wreath form, when I knew I could make my own!!  :) 
So, I looked around & found a nice box just sitting there, waiting to be used!!  :)  I used a large lid (from a salad bowl), traced it, then traced a smaller lid in the center. Then, using kitchen scissors, I cut out my wreath.


 I had some fabric in nice Easter colors in my stash! (They are much brighter than they appear!!) 
 I cut (well,tore) about 25 strips in each color - about 1" wide by 12" long.
Then, just tied the strips all over the wreath, following an ABC pattern!!


Lastly, I used fishing line to tie plastic eggs to the wreath!  Since the eggs already had holes in the tops & bottoms - this was easy!! ;)


Super simple & I think it turned out pretty cute!!  ;)

Saturday, March 17, 2012

Party Time!

It seems to always be "party time" at our house!!  With 6 of us in the house. . . there's always something to celebrate!! ;)  This time, our little Ladybug turned 3!!  Being that she is obsessed with the show, Olivia, it was an easy choice for the party theme!!  However, finding party supplies to go with the theme, wasn't so easy!!  :(  I looked everywhere - for a few months - and no luck!!  Target had like 2 things in their "One Spot" section & that was it!!  Of course, there was a ton of stuff online, but I didn't want to spend a ton & pay shipping - especially since we were keeping the party small & simple!!  Well - you can imagine my excitement when I found a few Olivia items at Party City!!!  (This was really a surprise because there aren't even any on their website!!)  I talked to an employee & she told me that they would indeed be getting more stuff soon!!  So, you can bet I checked back weekly until they did!!!  ;)  (One of the perks of planning ahead!!  ;)  We ended up getting cups, plates, napkins, a table cloth & balloons!  (Not a ton, but more than I had imagined!! ;)


One happy little girl!!  ;)


As far as the party goes, we kept it very simple: cupcakes & ice cream!  (I added a treat or two, but that's about it!)  We had pink lemonade cupcakes, red velvet cupcakes, vanilla ice cream, strawberry ice cream, and "Olivia" popcorn!  We played "pin the bow on Olivia" with a picture that I painted.  When the kids left, they got a simple goodie bag with a cute Olivia tag attached!  - - Like I said - we were going for simple!!  ;)

The goody bag tags & the thank you cards - made both online @ Wal-Mart!  The tags are actually Valentine's cards & I just uploaded an Olivia picture!  I added Olivia pictures to my thank you cards as well!!  Super simple!!  ;)
Simple goody bags!  Since we planned early - an Olivia party was perfect for after Valentine's Day!!  Pink & red were everywhere & found a bunch of trinkets on clearance!!


For "Pin The Bow on Olivia", I copied a picture of Olivia onto a Word document - then I enlarged the image as big as I could.  Only part of the picture fit onto the screen, so I printed the picture - then resized it, moved the image over - enlarged it - then printed again!  I repeated the process until I was able to print out every part of Olivia.  I taped it all together - taped it to a window (during the daytime), and outlined it in black.  With the final copy, I used a piece of carbon paper & traced the image onto a poster board.  After that, I used craft paint to paint it all in!!!  Now, I'm sure there's an easier way. . . but that's what worked for me!!!  ;)
Simply cut out red bows from cardstock & wrote the kids' names on them!


"Olivia" popcorn!!  (Microwave popcorn with melted red chocolate drizzled on top!)


Cupcakes!!

Sunday, February 5, 2012

Another T-shirt Redo!

Well, I figured that being that it's a new year, I better post something!!  :)  I've been so busy with so many things lately, just haven't had too much time to be crafty!!  (Think I said that a few times before!) :(  However, I did manage to do a quick t-shirt redo the other day & I think it turned out kinda cute!!  :)

 I started out with a plain long sleeve shirt.  (Forgot to take a picture before I cut the sleeves off, but I'm sure you can imagine what it looked like!!  ;)  I used a short sleeve shirt as my guide, and cut off the sleeves of the long sleeve shirt.
 Then, I cut the sleeves into strips, about an inch (or less) thick.


I pinned the strips onto the shirt, then sewed them on.  I didn't have the right green thread, so I chose pink - ya know, to add a little color!!  ;)


With the left over strips, I made a few flowers & sewed them on by hand.  Totally nothing fancy, but added a little fun to my plain shirt!!  :)