Showing posts with label Halloween. Show all posts

Tuesday, November 1, 2011

Costumes - Minnie Mouse!


Since my youngest is in LOVE with Minnie, her costume was easy to come up with!!  :)

For the skirt:
 * amount of fabric will depend on the size of skirt - I made a size 2T & had 1 yd. of fabric with a ton left over!!  I measured my daughter's waist & doubled it for the "width".  For the length of the skirt, I measured from her waist to just above her knee, then added about 2", to allow for hemming.
* tulle - if desired.  I used pink & black - less than a yd. each.
* elastic for waistband (mine was 3/4"  wide)
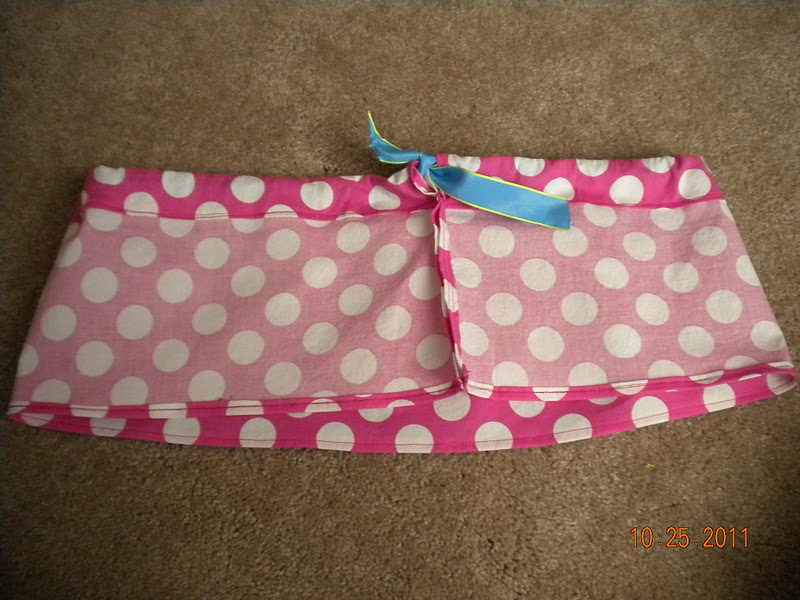

 Since my fabric wasn't long enough, I cut 2 equal length panels & sewed them together, creating a "tube".  Then, I turned it inside out & hemmed the bottom & top and left a gap on top for the elastic waistband.  (The blue ribbon you see was used to tie the skirt so I could make sure it fit ok!! ;)


After carefully measuring out my tulle, I cut 4 strips of pink & 4 strips of black, and layered them alternately.  Once pinned in place, I sewed them.


 This is the finished skirt.  I added another row of polka dots under the tulle layer to make the tulle stand out!  (As you can tell, my tulle is kinda faint - I thought 8 layers would be good. . . maybe 16 would be better??!! ;)  Finally, I added the elastic & it was done!!  :)


For the shirt:
 I cut one strip of fabric, about 2-3" wide.  (Length will depend on the collar of your shirt.)  I hemmed both edges & gathered one.


I pinned the collar onto the shirt & sewed in place.


Since the shirt was black & I wanted the patch to stand out, I attached it to white felt.


I trimmed the felt & sewed the felt onto the shirt BEFORE attaching the patch!  It would have been a pain to sew along the edge of the felt with the patch in the way!!


For ears:

 I cut 4 circles out of black (glittery) felt & sewed along edges.  Then, I folded the bottom edge & hot glued to a hair clip.  (Had to play with it a bit to get them to "stand" right!)


For the bow:
I cut a small length of fabric, (again, depending on head size), stitched ends together, then hemmed top & bottom.  Turned right side out.  Pinched center & used craft wire to hold in place.

 Used a small scrap of fabric (that was hemmed), to wrap around the center, covering wire, and hot glued in place.


I attached a hair clip to the BOTTOM of the center piece, not the back.  (Minnie's bow stands off her head, doesn't lay flat!! ;)  Then, added a little bling to the center!!  :)

Monday, October 31, 2011

Costumes - A Queen Bee!

Happy Halloween!!!  :)  Ok, so I'm barely making it in the same month as my last post, but oh well!!  ;)  Wanted to post some costume ideas, even if it's too late for this year!!  :/  The skirt ideas could be used all year long!!  This year, the costumes I made were: a Queen Bee, an Alien, a Safari Guide, and Minnie Mouse!!  :)  They were all relatively easy, but the skirts took a while!
**** NOTICE: I do am not, nor do I claim to be an expert seamstress!!  I can sew ok, but not perfectly!!  Being that these are only "costumes", which will be worn at night. . . in the dark - - I wasn't going for perfection!!  ;)  With that said. . .

This is the Queen Bee costume I came up with:
* 1 yd. striped fabric
* 1 yd. black tulle (had extra)
* 1 yd. yellow tulle (had extra)


** Yes - her shirt is crooked!!  It's not sewn crooked, just didn't straighten it for the picture!!  :(
I started with a black skirt we already had.  This skirt was knit & kinda hard to work with! :(  (Could have been from the shape of the skirt!!)
 I trimmed a little off the bottom, to remove the "angled" shape.
 I took my (pre-washed) striped fabric, and cut 6 strips.  (Sorry, don't know the exact length - can't think of the length of the fabric off hand!!  :(  The width will depend on the size of skirt you will be making.  I believe mine were around 6".
I hemmed the tops & bottoms of each layer & sewed 2 pieces together, giving me enough to make 3 layers. 
Then, I gathered the tops of each layer.  I repeated this process for both tulle layers.  The black tulle went on top of the stripes & the yellow went on the bottom. 
 I sewed the striped & the yellow layers together, then pinned them onto the skirt, attaching the black tulle at the same time.  I repeated this process until all three layers were on the skirt.

The finished product!!  :)  For the shirt - we went to Goodwill & found 2 cute shirts (on dollar day, I might add!! ;) & we were set!  I cut the straps off the black shirt, only because they were "itchy", so I just stitched the shirts together in 2 spots!  (This way, I can remove the black shirt & the yellow shirt can be worn again!!)


Accessories:
Since she was a "Queen Bee", she had to have a crown & a staff!!  ;)  (I found the wings at the 99 cent store!!! :)

For the staff:
I started with a paper mache ornament & a dowel - found both at Hobby Lobby.


 I took the ornament, and cut off the "hanger" part!  (Technical name, huh?? ;)  Then, I poked a hole in the bottom & made it large enough for the dowel to just fit.


 Next, I painted the dowel black, and the top gold.  After the pieces dried, I put the dowel into the top & hot-glued along the base.  I added some misc. gold ribbons & stuff that I had left over from my wedding (forever ago!!)!!  :)


 For the crown:
I drew a crown shape, free-hand (don't laugh!!), onto a thin piece of card stock (it was packaging from a scrapbook kit, so it was larger than 12x12").  It was folded in 1/2, so it cut 2, but I didn't cut on the fold!  (Wanted it to be thicker!!)  Then I cut 2 straps - again, wanting one thick strap!


I spray painted the pieces gold & hot glued them together!!  I added some more of the gold accessories & viola!!  A crown!!  ;)


Friday, October 29, 2010

Cutest Shirt Ever!!


OK - so this is the cutest shirt ever!!! Found it over at Get Your Craft On & it almost makes me want to have another one, just to be able to wear it . . . . . ALMOST!!! ;)

Thursday, October 28, 2010

Dress-Up Box

OK - I'm sure everyone out there with kids, has some form of "dress-up" box, stash, closet, etc.!!! Well, we do for sure!! (Ours is practically over-flowing!!) I don't like my kids to wear their actual Halloween costume to school, so I always come up with a quick & easy 2nd costume that can be worn at school!! Well, with Activity Day, a book report, 4 Halloween costumes, etc, etc, . . . . I didn't manage to create an elaborate 2nd costume, so off to the dress-up box I went!! :) Being that Noah was the only one "allowed" to wear a costume at school, (Madelyn's bummed that she's in the "upper grades" now!! :( , I figured it would be easy to find something for him with all the JUNK (I mean great dress up stuff) the boys have!! ;) We managed to come up with a vest, tattered pants, an eye patch, and a few other things & ta-da. . . . . a PIRATE!! :) Not too original, but it will work!! Noah is so easy to please & is excited to wear it all tomorrow!! (I think mostly for the clip-on earring!!) ;)