Tuesday, November 1, 2011

Costumes - Minnie Mouse!


Since my youngest is in LOVE with Minnie, her costume was easy to come up with!!  :)

For the skirt:
 * amount of fabric will depend on the size of skirt - I made a size 2T & had 1 yd. of fabric with a ton left over!!  I measured my daughter's waist & doubled it for the "width".  For the length of the skirt, I measured from her waist to just above her knee, then added about 2", to allow for hemming.
* tulle - if desired.  I used pink & black - less than a yd. each.
* elastic for waistband (mine was 3/4"  wide)


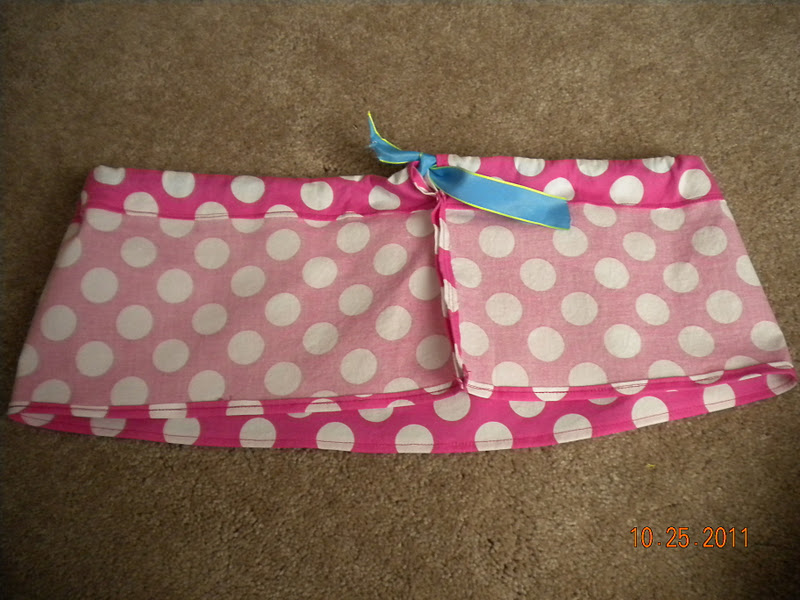
 Since my fabric wasn't long enough, I cut 2 equal length panels & sewed them together, creating a "tube".  Then, I turned it inside out & hemmed the bottom & top and left a gap on top for the elastic waistband.  (The blue ribbon you see was used to tie the skirt so I could make sure it fit ok!! ;)


After carefully measuring out my tulle, I cut 4 strips of pink & 4 strips of black, and layered them alternately.  Once pinned in place, I sewed them.


 This is the finished skirt.  I added another row of polka dots under the tulle layer to make the tulle stand out!  (As you can tell, my tulle is kinda faint - I thought 8 layers would be good. . . maybe 16 would be better??!! ;)  Finally, I added the elastic & it was done!!  :)


For the shirt:
 I cut one strip of fabric, about 2-3" wide.  (Length will depend on the collar of your shirt.)  I hemmed both edges & gathered one.


I pinned the collar onto the shirt & sewed in place.


Since the shirt was black & I wanted the patch to stand out, I attached it to white felt.


I trimmed the felt & sewed the felt onto the shirt BEFORE attaching the patch!  It would have been a pain to sew along the edge of the felt with the patch in the way!!


For ears:

 I cut 4 circles out of black (glittery) felt & sewed along edges.  Then, I folded the bottom edge & hot glued to a hair clip.  (Had to play with it a bit to get them to "stand" right!)


For the bow:
I cut a small length of fabric, (again, depending on head size), stitched ends together, then hemmed top & bottom.  Turned right side out.  Pinched center & used craft wire to hold in place.

 Used a small scrap of fabric (that was hemmed), to wrap around the center, covering wire, and hot glued in place.


I attached a hair clip to the BOTTOM of the center piece, not the back.  (Minnie's bow stands off her head, doesn't lay flat!! ;)  Then, added a little bling to the center!!  :)

Monday, October 31, 2011

Costumes - A Queen Bee!

Happy Halloween!!!  :)  Ok, so I'm barely making it in the same month as my last post, but oh well!!  ;)  Wanted to post some costume ideas, even if it's too late for this year!!  :/  The skirt ideas could be used all year long!!  This year, the costumes I made were: a Queen Bee, an Alien, a Safari Guide, and Minnie Mouse!!  :)  They were all relatively easy, but the skirts took a while!
**** NOTICE: I do am not, nor do I claim to be an expert seamstress!!  I can sew ok, but not perfectly!!  Being that these are only "costumes", which will be worn at night. . . in the dark - - I wasn't going for perfection!!  ;)  With that said. . .

This is the Queen Bee costume I came up with:
* 1 yd. striped fabric
* 1 yd. black tulle (had extra)
* 1 yd. yellow tulle (had extra)


** Yes - her shirt is crooked!!  It's not sewn crooked, just didn't straighten it for the picture!!  :(
I started with a black skirt we already had.  This skirt was knit & kinda hard to work with! :(  (Could have been from the shape of the skirt!!)
 I trimmed a little off the bottom, to remove the "angled" shape.
 I took my (pre-washed) striped fabric, and cut 6 strips.  (Sorry, don't know the exact length - can't think of the length of the fabric off hand!!  :(  The width will depend on the size of skirt you will be making.  I believe mine were around 6".
I hemmed the tops & bottoms of each layer & sewed 2 pieces together, giving me enough to make 3 layers. 
Then, I gathered the tops of each layer.  I repeated this process for both tulle layers.  The black tulle went on top of the stripes & the yellow went on the bottom. 
 I sewed the striped & the yellow layers together, then pinned them onto the skirt, attaching the black tulle at the same time.  I repeated this process until all three layers were on the skirt.

The finished product!!  :)  For the shirt - we went to Goodwill & found 2 cute shirts (on dollar day, I might add!! ;) & we were set!  I cut the straps off the black shirt, only because they were "itchy", so I just stitched the shirts together in 2 spots!  (This way, I can remove the black shirt & the yellow shirt can be worn again!!)


Accessories:
Since she was a "Queen Bee", she had to have a crown & a staff!!  ;)  (I found the wings at the 99 cent store!!! :)

For the staff:
I started with a paper mache ornament & a dowel - found both at Hobby Lobby.


 I took the ornament, and cut off the "hanger" part!  (Technical name, huh?? ;)  Then, I poked a hole in the bottom & made it large enough for the dowel to just fit.


 Next, I painted the dowel black, and the top gold.  After the pieces dried, I put the dowel into the top & hot-glued along the base.  I added some misc. gold ribbons & stuff that I had left over from my wedding (forever ago!!)!!  :)


 For the crown:
I drew a crown shape, free-hand (don't laugh!!), onto a thin piece of card stock (it was packaging from a scrapbook kit, so it was larger than 12x12").  It was folded in 1/2, so it cut 2, but I didn't cut on the fold!  (Wanted it to be thicker!!)  Then I cut 2 straps - again, wanting one thick strap!


I spray painted the pieces gold & hot glued them together!!  I added some more of the gold accessories & viola!!  A crown!!  ;)


Tuesday, October 4, 2011

Army Party

My son just turned 6 & wanted an "Army" themed party!  I've had camouflage on my brain for about a month!!! :)  I was so excited when I found a super simple, super cheap camouflage party section at Wal-Mart!!  Each item was only $0.97!!  I grabbed some plates, napkins and table cloths!!  Over in the regular paper products section, I found some normal-sized camo Hefty cups!!  (And even had a coupon!! ;)

For the goody bags, I used regular brown lunch sacks, scrapbook paper, glue & die-cuts made with my Cricut machine!  This is what I came up with:

I printed the "6" & tore the edges - attached to a square of camo paper, then glued (with Elmer's glue - my scrapbook adhesive wouldn't stick that well to the bag!) onto the bag!  I made the "dog tags" with a military Cricut cartridge, then attached to the bag with some green jute!  (I found it in the hardware section - it's garden twine & was under $2!)  I found mini grenade squirt guns, camo airplanes & camo bracelets all at the Dollar Store!!  I also got some plastic dog tags & treats at Wal-Mart!

 I found these cool cupcake liners at Hobby Lobby!  You can use them without a cupcake pan, but I wouldn't suggest it - mine spread out & were kind of "fat"!  :(  (Kids didn't mind, of course, but not as "neat" as the others I made!)
 Simple cupcakes, topped with a soldier!!
My son's tank cake!!  Super easy!!  For this cake, I used:
* 6 York Peppermint Patties (or chocolate cookies)
* Chocolate licorice (or mini Twix)
* frosting
* 1 sucker stick
* toothpicks


Here's how to assemble the tank:
 1.  First, I used a small, oven-proof glass bowl, and filled about 1/3 full with cake batter.  (I added green coloring, as you can tell! ;) I baked according to directions, but watched carefully, as it was such a thin cake!
 2. Once it cooled completely, I (tried to evenly) cut off the 2 side pieces.
 3.  Next, I placed the 2 pieces on top of the middle piece.
 4.  Then, I trimmed of the ends of the top pieces.  I put toothpicks through the tops of the two pieces, and a few through the sides, just to make sure they'd stay!
 5.  I "dirty iced" (to quote the Cake Boss ;) the cake, so all the crumbs would stay put!  I let it chill in the fridge for about 10 min.
6. Once chilled, I frosted the entire cake!  I let that layer chill, then added the finishing touches!!  Measure your licorice pieces to fit along the far right & left edges of the bottom layer, and cut enough to fill both sides.  Place as many Peppermint Patties that fit, along each side of the the bottom layer to represent "wheels" - since my cake was small, I only fit 3 on each side!  Use toothpicks to secure.  Lastly, measure a piece of licorice to fit about 1/2 of a sucker stick, and insert the stick inside the licorice.  Using the exposed end of the stick, poke into center of bottom layer, just under the top layer.


Our party was quite simple - just had it at the party with family, but we had a great time!!!  :)

Saturday, September 10, 2011

Calendar Puzzles

At the end of the year, (or just after the beginning of the next year), you can find calendars very cheap!  (And usually anytime at the Dollar Store!!)  With 2 calendars, you can make 11-12 puzzles!!  (Depending on how the first month is printed!)  Cut up one calendar for puzzle pieces & use the other to show what the finished puzzle will look like!  The calendar I used fit inside a letter-sized envelope.  I laminated the pieces & labeled each puzzle!  Easy peasy!!  ;)
 I number my puzzles & then number each piece - in fractions - this helps so much when ALL 12 puzzles get dumped at the same time!!!  ;)

Wednesday, August 31, 2011

Mirror Re-do

I found this mirror at Goodwill (or "Goodjohn's" as my son calls it ;) - for only $2.99!!  It wasn't horrible "before", but I like the "after" better!!  :)  I used Apple Barrel Gloss paint - in black, of course, and after a few coats, it was done!!  (Could totally use spray paint, but I didn't have any on hand!!)  Now I just have to find the perfect spot for it!!  ;)


 Before
After

Teacher Treats

A few weeks ago, we wanted to give the primary teachers a little something just to thank them for all they do!  (This could totally work for school teachers too!!)  So, I baked some cookies & came up with a little poem to go along!  I gave each teacher 3 cookies - an M&M cookie, a chocolate chip cookie, and a chocolate-white chocolate chip cookie - put them in a bag & tied on the poem!! 


Super simple!  (However, baking 90 cookies & assembling 30 poems & bags took some time!!)  ;)  This was my poem:

Here are some cookies, that were baked especially for you.
This is a simple "thank you" for everything that you do!
You'll notice one is different and more colorful than the rest - 
that cookie's just like you, 'cause our teachers are
THE BEST!!!


Besides the M&M cookies, the others were made using cake mixes!!  SO EASY!!  Check out my recipe blog for the recipes!!  If you didn't want to use M&M's, you could use a Funfetti cake mix & it would still work with the poem!! ;)